
Blimey, its been far too long since I last updated this, at least from a written content point of view anyway!
So the sharp eyed of you will of noticed that there has been a regular stream of photos being added here under the Galleries menu. now initially those photos were of the first rough design ideas for the MKIII (posted on the muddybuggies forum I will create a gallery for them here soon) which was going to be based on an AUDI TT, now those plans have changed somewhat, I am not saying the MKIII isn’t going to be built, it’s just on the back burner for a while due to several other commitments and a slight (or possibly drastic) turnaround on the MKII buggy…… Let me explain…………………………..
So in order to fund the construction of the MKIII I needed to sell the existing MKII buggy – For the cash and so I had the space, building in a single garage is problematic enough without the issue of it being full before you even start! – so adverts were written and photos taken ready for the sale. I even put the Ebay Motors add together ready to sell it!. Then over a coffee (What a wild life I lead) one night my better half informed me that she would hate to see it go after only finishing it recently and having only covered approx. 1600 miles in it over the last 18 months, I explained that “Yes, it was a shame” but “we are too restricted with the existing buggy as it’s a pain on the motorway due to its lack of power” I then went on to explain that the next buggy wouldn’t suffer this as it’s based on a solid, bigger, far more powerful engine and would be 4 wheel drive – “Hmmmm” was the response “So why can’t you do that to the existing buggy?” she said “ I could” I replied “But the change to the existing buggy would be massive and it’s probably easier to start again”, “But” she said “ it would be quicker to do an engine swap than build a new buggy – I don’t fancy another 6 year wait!” – Now at this point I had to agree, plus if I did it right I wouldn’t need to put it through the IVA test again………. So back to the drawing board and after many cups of coffee and several biscuits I came up with a plan, NOT, if I am honest a massively well thought through plan, but a plan none the less!
So…. If I was to do an engine swap, I would do an engine swap that would provide me with some insight into what the job of building the MKIII would be like, I couldn’t go 4 wheel drive as that would be far too much of a chassis change (almost a total re-build ) and would require yet another costly and time consuming IVA test. However the engine in the TT is used across the VW/AUDI range in both 4 wheel and 2 wheel drive so I could select a 2 wheel drive vehicle running a similar engine (in the end almost identical) which would give me loads of useful info on fitting / dimensions / wiring / setup / modifications and tuning and would transplant into the back of the MKII creating the MKIIb ( I really need to think of a name) giving loads more power to play with!
So given the green light on the conversion (well I wasn’t told no anyway..lol) I started looking for a suitable engine / gearbox option – I needed something which wasn’t a fortune to buy, was readily available, had a good community support for tuning and modification etc. In the end I went for the VW 1.8T engine from the MKIV Golf GTI and in particular the AUM block with associated 04s turbo and matching ECU (programmable ) this block has been used across VAG for years in various forms and is a firm favourite for modders and tuners.
It didn’t take long to locate a couple of engines on ebay which looked ok and with the assistance of a friend and the hire of a small van I took a trip to a scrap yard a couple of hours away to pick up the engine / gearbox / ecu and loom – we were told the rest was getting crushed so take what we wanted (which we did) – we also got to hear it running prior to us removing it!
With the road trip over and the engine now safely at home I got straight to stripping and cleaning it down to remove the years of road filth and oily crappy deposits all over it from the scrap yard (they used to use it to get around the yard and up and down the private road to it – until someone wrecked the front end!) once cleaned up a little so I could see what I was dealing with I pulled the old engine out of the buggy and swung the new one in with the engine hoist… now obviously I knew it wasn’t going to fit into the frame and drop onto the old mounting points straight off but it didn’t even get past the rear cage!! – I had a lot of work on my hands!
After much scratching of head, many cups of coffee and several biscuits, I came to the conclusion that the only way to go was cut the rear of the buggy frame off right behind the main roll-bar, and start from scratch with a whole new mounting system, and if I was going to do that I decided to make as much of it removable as possible to make it easier to work on in the future. So out came the angle grinder and with “What the hell am I letting myself in for” running through my head I cut the entire rear cage off!

With the buggy in two main parts and the rear frame safely put to one side, it was a lot easier to position the engine and decide how best to mount it. The 1.8T AUM engine is supported on the left and right by a fairly large engine mount that mounts onto a flat surface (Hooray!) and then there is a small stabiliser mount called a dogbone mount under the gearbox, that in the original vehicle would mount back to the bulkhead. Given that this engine was now mid-mounted the dogbone now had nothing to mount to and was flapping about in mid-air! So I took lots of measurements and photos and went back to the design software to re-work the backend.
Back at the design I decided that I needed some way of moving the buggy around during what was looking like quite an extensive re-build. Looking around the internet for a purpose built buggy lift provided nothing, so back to the design software again to knock up a quick drawing for a simple build table. Well at least that’s how it started anyway, eventually even this simple table idea turned into a hydraulic scissor buggy lift , large enough to lift the entire buggy off all four wheels up to a 1 metre off the ground!
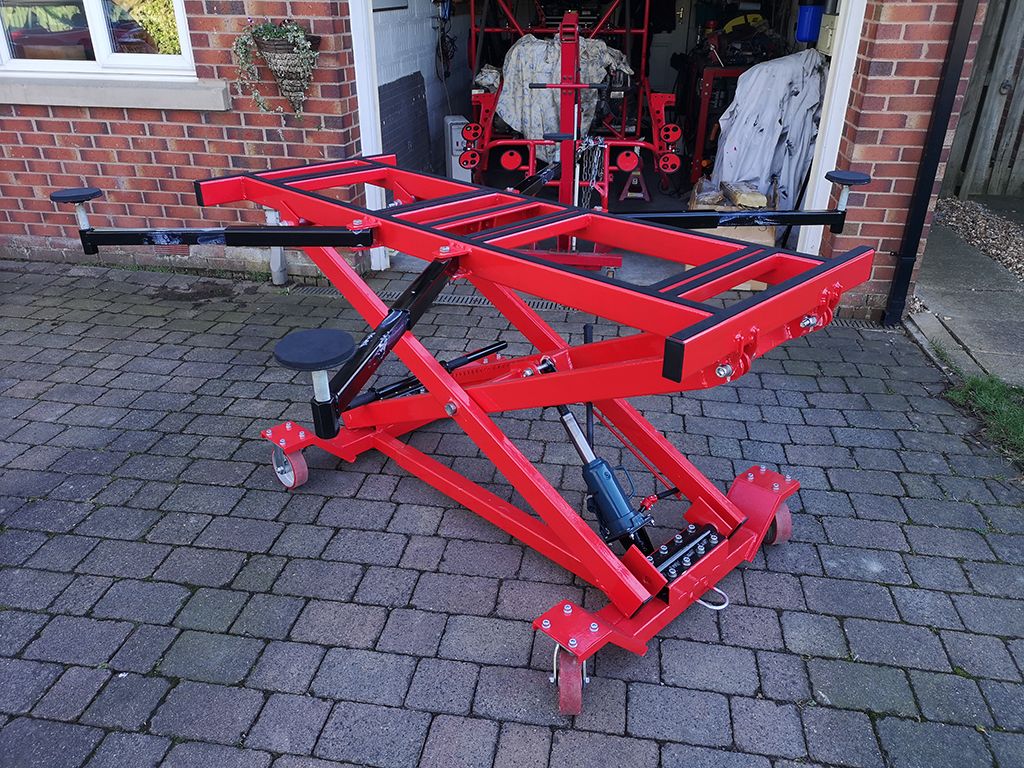
– still it was worth the time to design and build it as its made working on the buggy and moving it about without any wheels on it a total breeze. Another very useful thing I did during the design and build of the lift was to get the major flat components laser cut by a local company, this saved masses of time and also made me re-consider how the buggy re-build would be done.
Learning from the Scissor lift build I designed as many components for the rear of the buggy from flat interconnected pieces which could be laser cut ready for me to weld together – this has saved me months of hand cutting and listening to screeching hole saws. The” laser cut as much as possible” approach has made a massive impact to the way the buggy is now taking shape, far more complex components which are far more accurate than I would have been able to achieve are now being built. The simplicity of designing the parts, ensuring they fit on the 3d model within the software and then outputting a cutting file to email to the company for laser cutting is great (Thankyou AK Stainless).
The design for the rear of the buggy has taken a while to get right, but I think its looking pretty good now. I have decided to go with a full subframe under the engine which bolts directly to the chassis and the main engine mount outriggers (see pictures). This means all the suspension arms attach to the subframe and the rear cage (which will be on removable bolt in fittings) will support the upper shock mount only now.

So where are we now – well as of this weekend (14/4/19) the engine is sat on its engine mounts, the subframe is built (although just tacked together at the moment) and both rear hub carriers are also built (again only tacked together) and everything is sat on the buggy scissor lift! Next stage is to finish welding the subframe and hub carriers, and build the new lower suspension arms and modify the upper arms to fit the new subframe, after that its back to the engine wiring to get the engine turned over to test for compression and see what additional work I need to do on it! – oh and finish off he designs for all the other parts I still need to build (front hub carriers etc) who said an engine swap was simple!
For loads of pictures on the progress check out the Mark 2 engine swap gallery!